Workflow C: Create Structural Openings
As a structural engineer, you need openings in your structural walls wherever the architect has placed doors and windows. Instead of modeling these openings manually, ConVoid reads the linked architectural model, detects where doors and windows intersect your structural walls, and places face-based structural openings automatically.
This workflow is specifically designed for structural engineers working with a linked architectural model.
In Workflow B, you adopt existing Provision for Voids (generic openings) from a linked model. In Workflow C, ConVoid converts linked doors and windows into face-based structural openings. The structural opening families (CC Structural Opening - Door/Window) are wall-hosted, unlike the generic ConVoid families used in Workflows A and B.
Before you begin, make sure you have completed these steps from earlier chapters:
- Import ConVoid Families into your project.
- Link the Revit or IFC model that contains the Doors and Windows.
- Define the Creation Scope.
- Create and save your profile.
User Interface Overview
Here is the ConVoid dialog for converting structural openings.
Step 1: Import ConVoid Families
Before starting, import the required ConVoid families into your project. This workflow uses specific structural opening families that are face-based (wall-hosted), unlike the generic families used in Workflows A and B.
The families are located at Documents/conclass/Revit Content/%year%/%language%. If you cannot find them, download them here.
Structural Openings (required for doors and windows):
- CC Structural Opening - Door
- CC Structural Opening - Window
Generic Openings (required for the process to work):
- CC Horizontal Opening Circular
- CC Horizontal Opening Rectangle
- CC Horizontal Recess Circular
- CC Horizontal Recess Rectangle
- CC Vertical Opening Circular
- CC Vertical Opening Rectangle
- CC Vertical Recess Circular
- CC Vertical Recess Rectangle
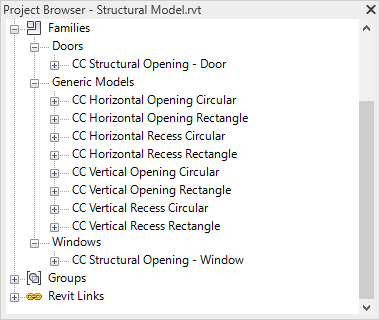
Even though this workflow primarily uses the structural opening families, ConVoid requires the generic families to be loaded as well. If any are missing, the process will not start.
Step 2: Create an Opening Filter
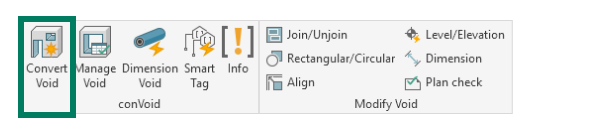
Go to the [conclass] ribbon tab in Revit and click Convert Void to open the ConVoid dialog.
Create an Opening Filter. Give it a descriptive name, such as "Structural Openings" or "Doors from Architecture".
If you have multiple linked architectural models, you can create one filter per model.
| Icon | Action | Description |
|---|---|---|
| Create new filter | Creates a blank Opening Filter with default settings. | |
| Duplicate filter | Copies all settings of the selected filter. Useful when creating a second filter for another discipline. | |
| Rename filter | Give the filter a meaningful name, e.g. "Ventilation" or "Plumbing". | |
| Delete filter | Removes the selected filter permanently. | |
| Export filters | Saves all Opening Filters to an *.xml file for reuse in other projects. | |
| Import filters | Loads Opening Filters from an *.xml file into your project. |
Step 3: Set the Creation Scope
Define the upper and lower levels (and optional offsets) between which ConVoid should create openings. Only doors and windows within this range will be processed.
If the Section Box in your 3D View is activated, the scope settings are grayed out because ConVoid uses the Section Box boundaries instead. Learn more in Define the Creation Scope.
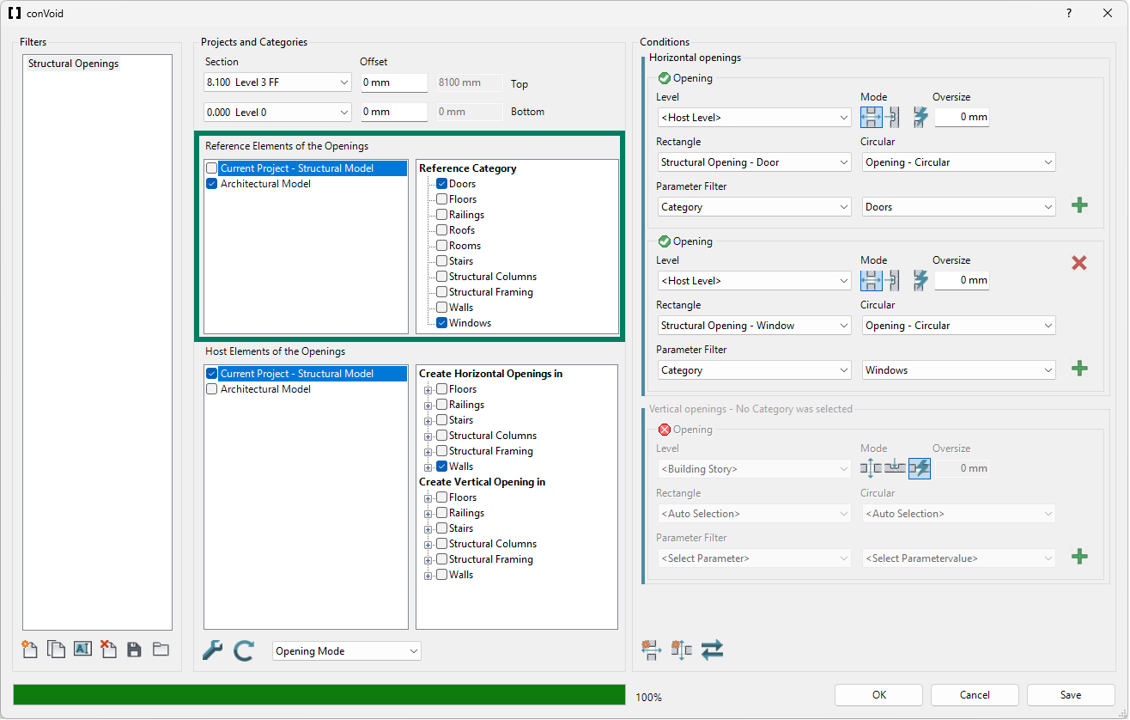
Step 4: Select Reference Elements
The Reference Elements are the linked architectural doors and windows that ConVoid will convert into structural openings.
- Select the linked architectural project that contains the doors and windows.
- Choose the categories Doors and Windows.
Step 5: Select Host Elements
The Host Elements are your structural walls where ConVoid will place the openings.
- Select your current project (the structural model).
- Under Create Horizontal Openings in, select the category Walls.
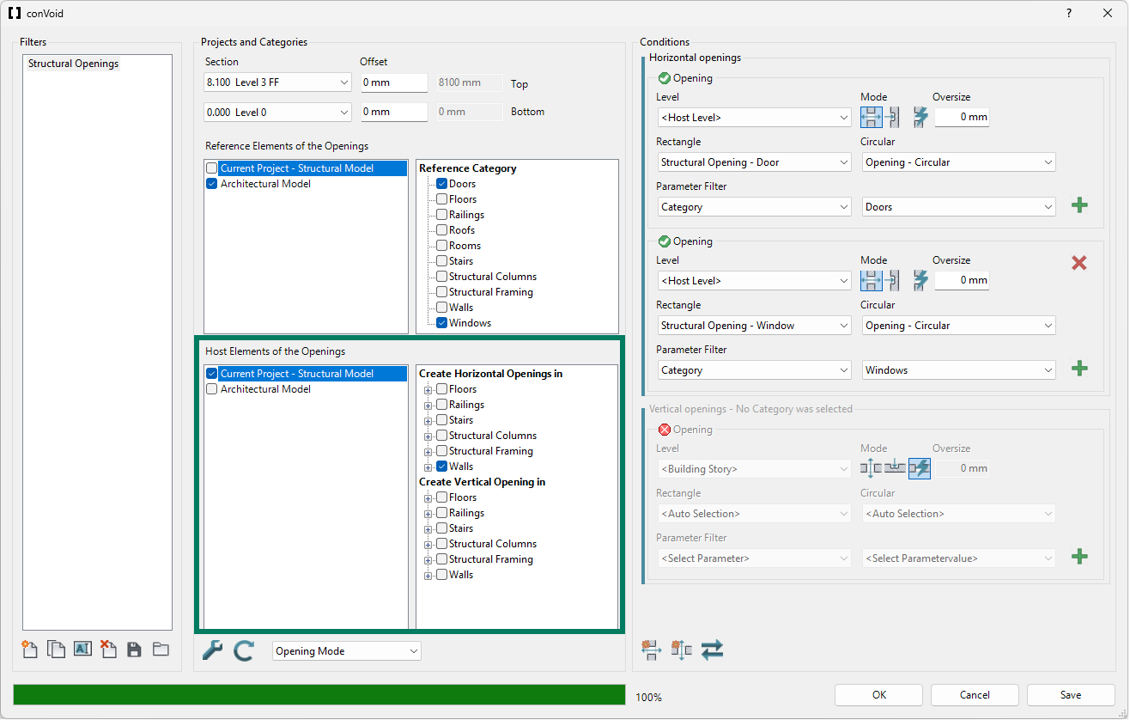
You can click the plus sign (+) next to a category to limit the creation to specific family types. If no types are selected, ConVoid uses all elements in that category. However, we recommend using the Exclude Elements by a 3D View feature instead, as it gives you more control and is easier to manage across updates.
Step 6: Run Clash Detection
Click the Refresh button to start the clash detection between the linked doors/windows and your structural walls.
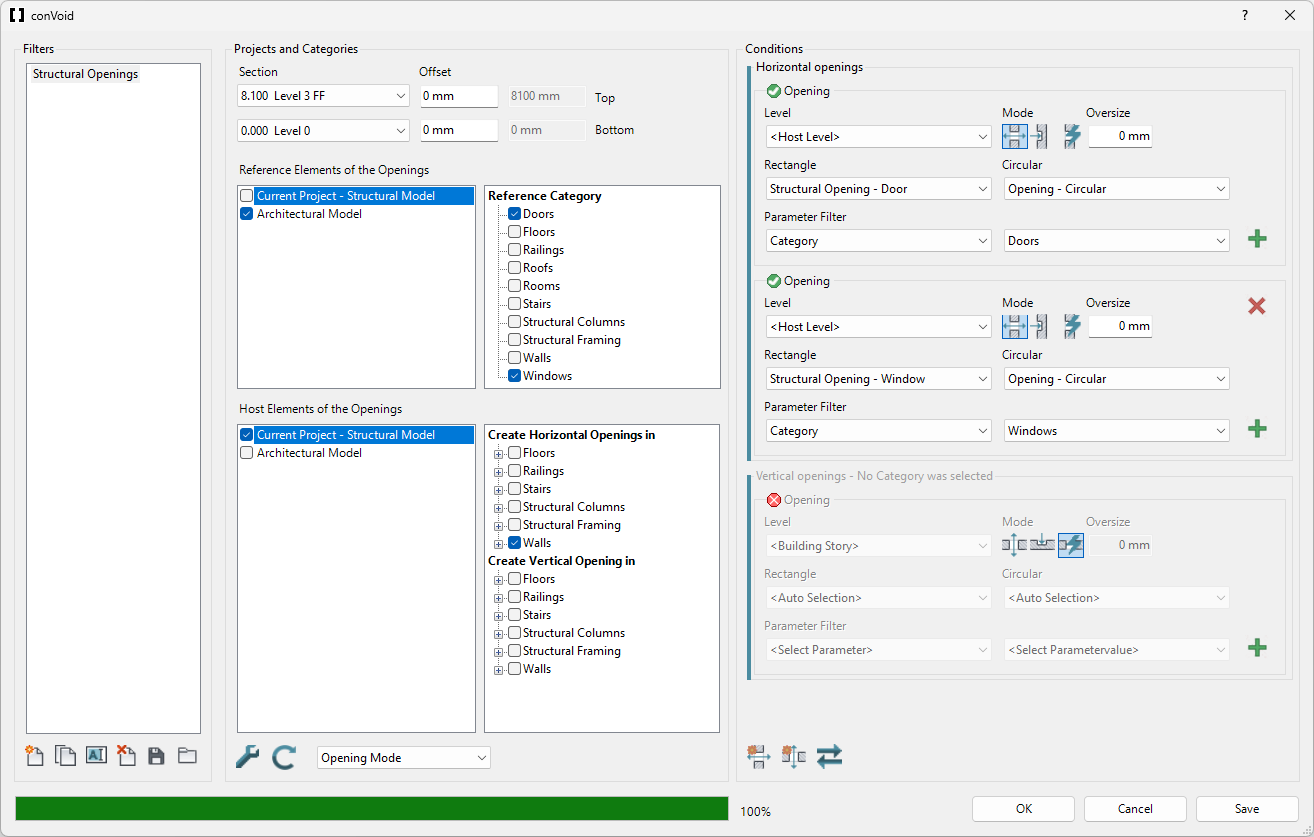
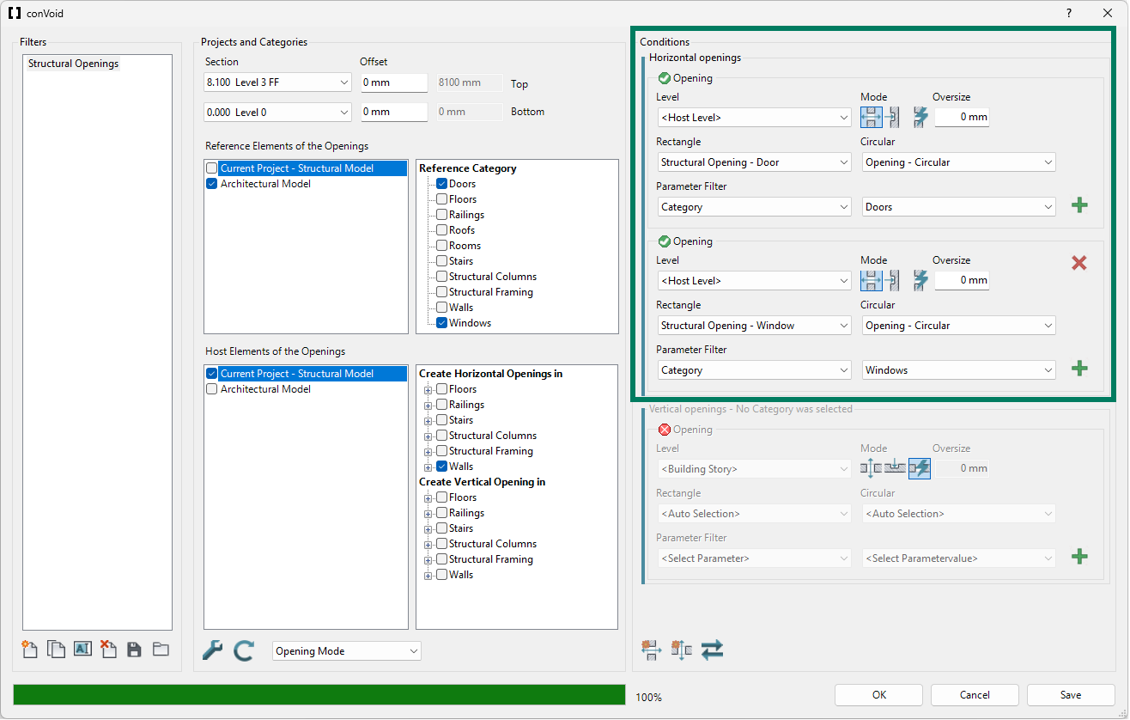
Step 7: Conditions and Parameter Filter
After the clash detection completes, configure the conditions for the structural openings.
Level for Horizontal Openings
Use Host Level. The opening follows the base level of the host wall.
Other options: Building Story (nearest upper/lower story), Reference Level (follows the door/window level), Specific Level (a fixed level you choose).
Creation Mode
For structural openings from doors and windows, always use the Opening mode:
| Icon | Action | Description |
|---|---|---|
| Opening | Creates full penetrations through the host wall, even if the door or window does not fully intersect it. |
Doors and windows always require a full penetration through the wall. The Recess and Auto modes from Workflow B are not needed here.
Oversize
Since the goal is to match the exact dimensions of the linked doors and windows, keep the oversize value at 0.
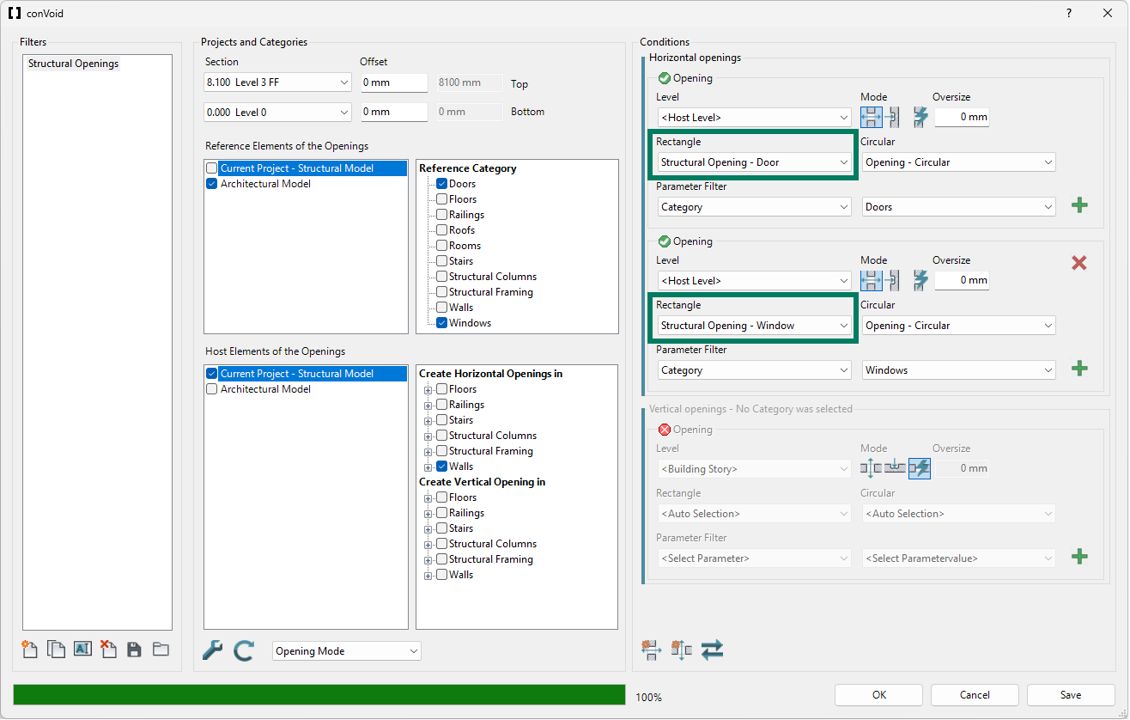
Rectangle and Circular Families
In the Rectangle dropdown, select the appropriate structural opening family:
- CC Structural Opening - Door for door openings
- CC Structural Opening - Window for window openings
If these families are not listed, go back to Step 1 and import them.
Parameter Filter
Set the parameter to Category and the value to Doors (or Windows, depending on the family you selected above). This tells ConVoid to only process elements from that specific category.
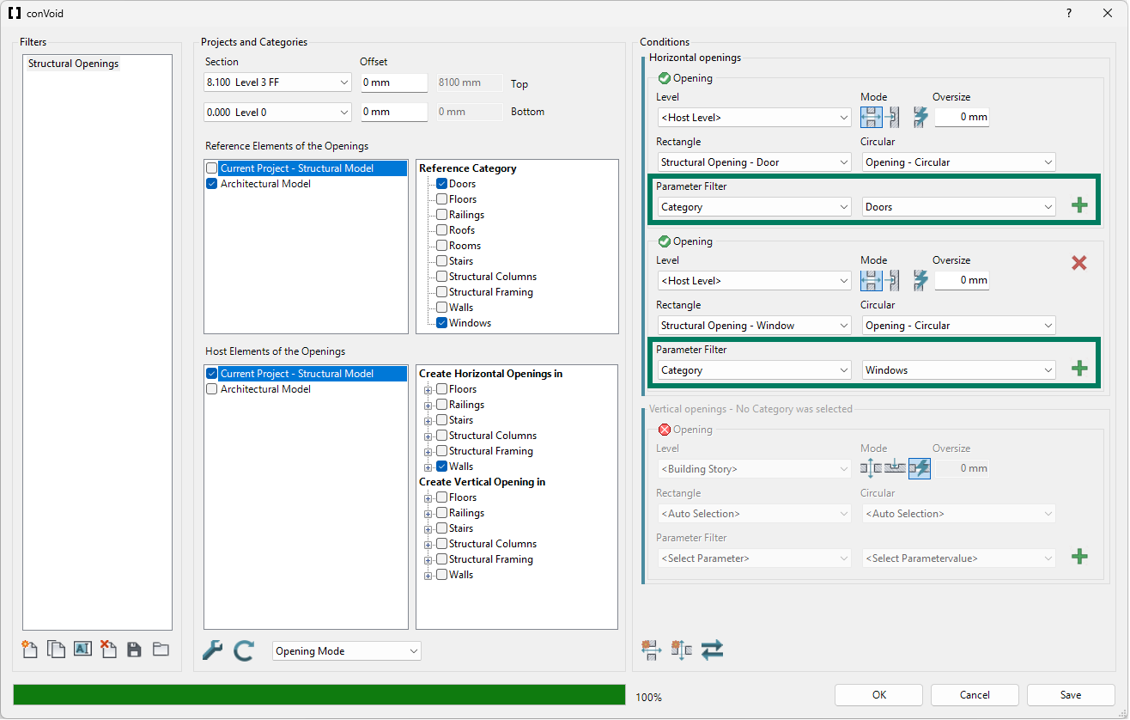
Add the Second Opening Type
Click Add Horizontal Opening Type to add the second category. If you configured doors first, now configure windows (or vice versa). Select the matching structural opening family and set the parameter filter to the other category.
The recommended approach is to configure both doors and windows within a single Opening Filter by adding two horizontal opening types. This keeps the setup simple and avoids filter conflicts.
Step 8: Start the Creation Process
Click OK to start. ConVoid places the structural openings automatically in your project. All settings are saved when you click OK.
The structural openings appear as symbols in 2D views and as solids in 3D views. You can customize the symbols in the Family Symbols chapter.
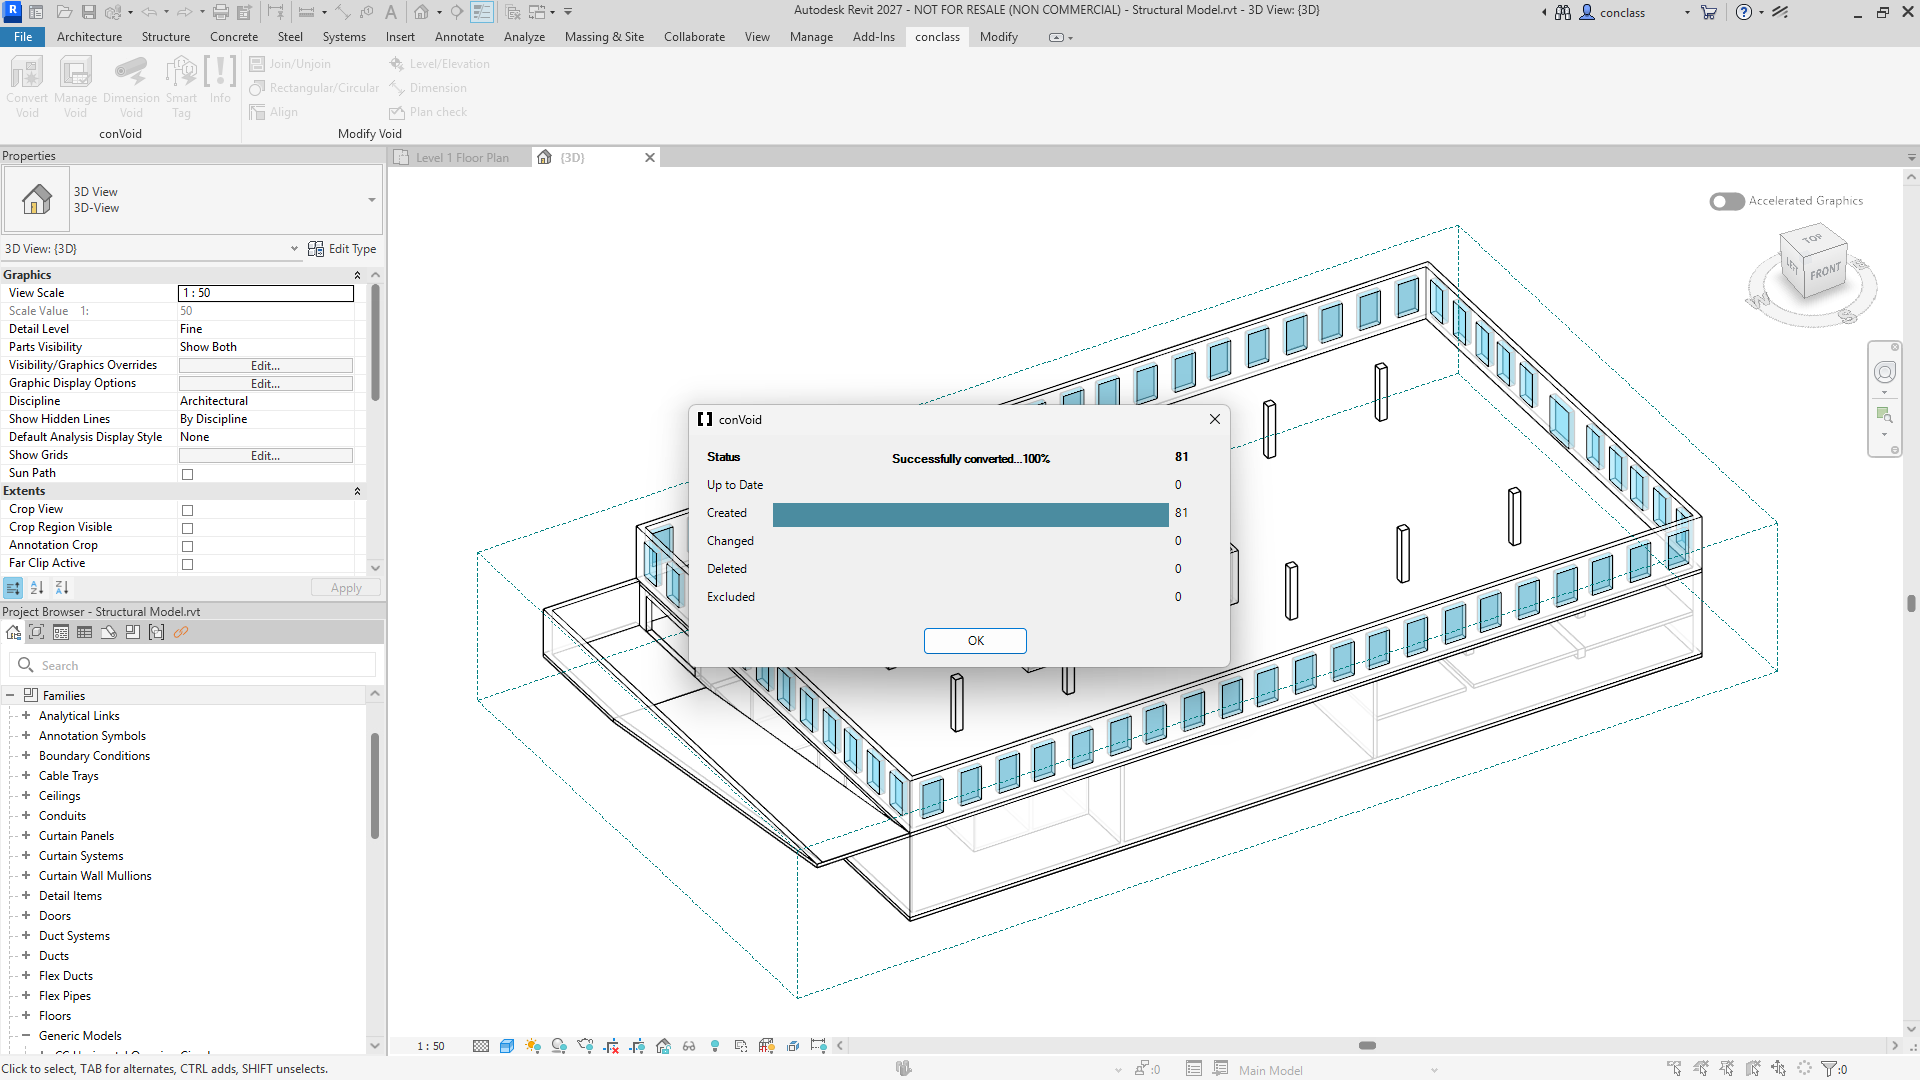
After the creation process, review the result summary. Check that the number of created, changed, and deleted elements makes sense. If the results look unexpected (e.g. too many openings marked as deleted), undo immediately with Ctrl+Z and review your filter settings before running again.
Verify Your Results
After the creation process:
- Check the ConVoid report that appears after the run. It shows how many openings were created or skipped.
- In the linked architectural model, hide the Doors and Windows categories (Visibility/Graphics > Linked File tab) so only the architectural walls remain visible.
- In your structural model, isolate the ConVoid structural opening families (CC Structural Opening - Door / Window) in a 3D view.
- Check that the walls of the architectural model align with the structural openings. Each opening should sit exactly where the architect intended a door or window, with no gaps or overlaps.