Exclude Elements from ConVoid
Every time you run ConVoid, it recalculates all openings based on the current state of your host and reference elements. But sometimes you need to prevent certain elements from being part of this process. Excluding elements gives you full control over which openings, hosts, or reference elements ConVoid considers.
Common use cases for excluding elements:
- Freeze an approved opening - After an opening has been approved, exclude it so that future ConVoid runs do not change its size or position, even if the host or reference elements are modified.
- Protect structural elements - A structural engineer can exclude specific columns, beams, or walls to prevent anyone from placing openings in them when running ConVoid.
- Ignore specific elements - Exclude non-bearing walls, certain MEP elements, or other elements that should not trigger opening creation.
ConVoid offers two methods to exclude elements. Which one you should use depends on your situation:
| Method 1: Exclude Parameter | Method 2: Reference 3D View | |
|---|---|---|
| Best for | Excluding individual openings in your own model | Excluding multiple host or reference elements, including from linked models |
| Works with linked models | No - you cannot change parameters on linked elements | Yes - hide linked elements in the reference 3D view |
| Scope | Per element | Per view (all hidden elements are excluded) |
Video Tutorial
- Workflow A: Create Openings
- Workflow B: Adopt Openings
- Workflow C: Structural
The exclusion methods described in this chapter work the same way for the Structural Openings workflow. Watch either of the other video tutorials to see the process in action.
Method 1: Exclude by Parameter
All ConVoid families include the parameter "Exclude from conVoid". When you run ConVoid for the first time, this parameter is also automatically added to the host and reference elements in your model.
To exclude an element, select it in Revit and set "Exclude from conVoid" to Yes in the Properties panel.
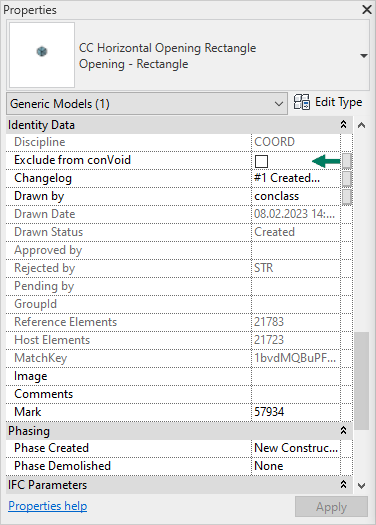
Do not use Revit's Pin function to freeze openings. Pinning does not prevent ConVoid from modifying the opening's parameters. Always use the "Exclude from conVoid" parameter instead.
When you exclude an opening, ConVoid will still update the transferred parameters (as configured in Parameter Transfer). This means information like system name, fire rating, or other reference data continues to flow to the opening. Only the geometry (size, position, shape) is frozen.
Method 2: Exclude by Reference 3D View
This method lets you exclude multiple elements at once by hiding them in a dedicated 3D view. ConVoid will only create openings based on elements that are visible in that view. This is the recommended approach when you need to exclude host or reference elements from linked models.
Step-by-step
Do not use an existing 3D view for this purpose. Any change to the reference 3D view - by you or a colleague - directly affects ConVoid's results. If someone hides additional elements or changes filters in that view, ConVoid will exclude those elements on the next run, potentially marking existing openings as "Deleted".
-
Create a new 3D view specifically for ConVoid. Name it clearly (e.g. "3D - ConVoid Reference"). Do not use this view for any other purpose.
-
Hide the elements you want to exclude in this view. Use Revit filters, category visibility, or hide elements manually. For example, hide non-bearing walls or specific MEP elements like hangers.
-
Ensure your entire project is visible in this view (no Section Box, no cropping).
Make sure the Section Box is not activated in the reference 3D view. If the Section Box is active, ConVoid will only process elements inside the box and ignore everything outside - this will cause openings outside the box to be marked as "Deleted".
-
Switch to a different view (e.g. your working floor plan or another 3D view) to start the ConVoid process. Do not run ConVoid from the reference view.
-
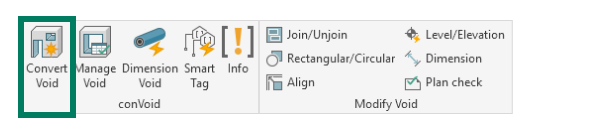
Go to the conclass ribbon tab and click Convert Void.
-
Select your filter and click the settings icon to open the ConVoid settings.
-
Select the reference 3D view in the dropdown menu in the Element Filter section.
-
Disable one or both options to tell ConVoid to exclude hidden elements:
- "Include Host Elements not visible in the selected 3D view" - Uncheck to exclude hidden host elements (walls, floors, beams, etc.)
- "Include Reference Elements not visible in the selected 3D view" - Uncheck to exclude hidden reference elements (pipes, ducts, cable trays, etc.)
-
Run ConVoid. It will now skip all hidden elements and not create openings based on them.
Verify your results
After running ConVoid with a reference 3D view, check the following:
After the creation process, review the result summary. Check that the number of created, changed, and deleted elements makes sense. If the results look unexpected (e.g. too many openings marked as deleted), undo the creation immediately with Ctrl+Z and review your filter settings before running again.
If you are unsure about your reference 3D view settings, keep both "Include" options enabled (checked). This way ConVoid considers all elements regardless of visibility. You can then selectively disable them once your reference view is properly configured.