Sizing and Oversizing
Introduction
After creating openings, you often need different oversize values for different MEP systems. For example, cable trays may require 50 mm oversize on each side, while pipes need a fixed diameter of 150 mm for fire protection sealing.
The Dimension Void feature lets you adjust opening sizes for groups of openings based on filters - without modifying each opening manually. This is the recommended way to handle per-system oversizing.
You can set a general oversize when creating or updating openings in Workflow A. However, if your project requires varying oversizes for different MEP systems (e.g., pipes vs. ducts vs. cable trays) or different values per side (e.g., 37.5 mm sides, 62.5 mm top for fire dampers), use Dimension Void instead. It gives you full control over sizing per group after creation.
When you update openings, ConVoid recalculates and may reset manually changed oversize values. To prevent this, either use the Dimension Void feature to manage oversizes (recommended), or enable the "Preserve Oversize" parameter on individual openings. Do not modify Width, Height, or Diameter parameters directly - use the Oversize parameters instead.
Video Tutorial
Dimension Void
Open the Dimension Void feature from the conclass Ribbon Tab.
Oversize and Rounding-Up
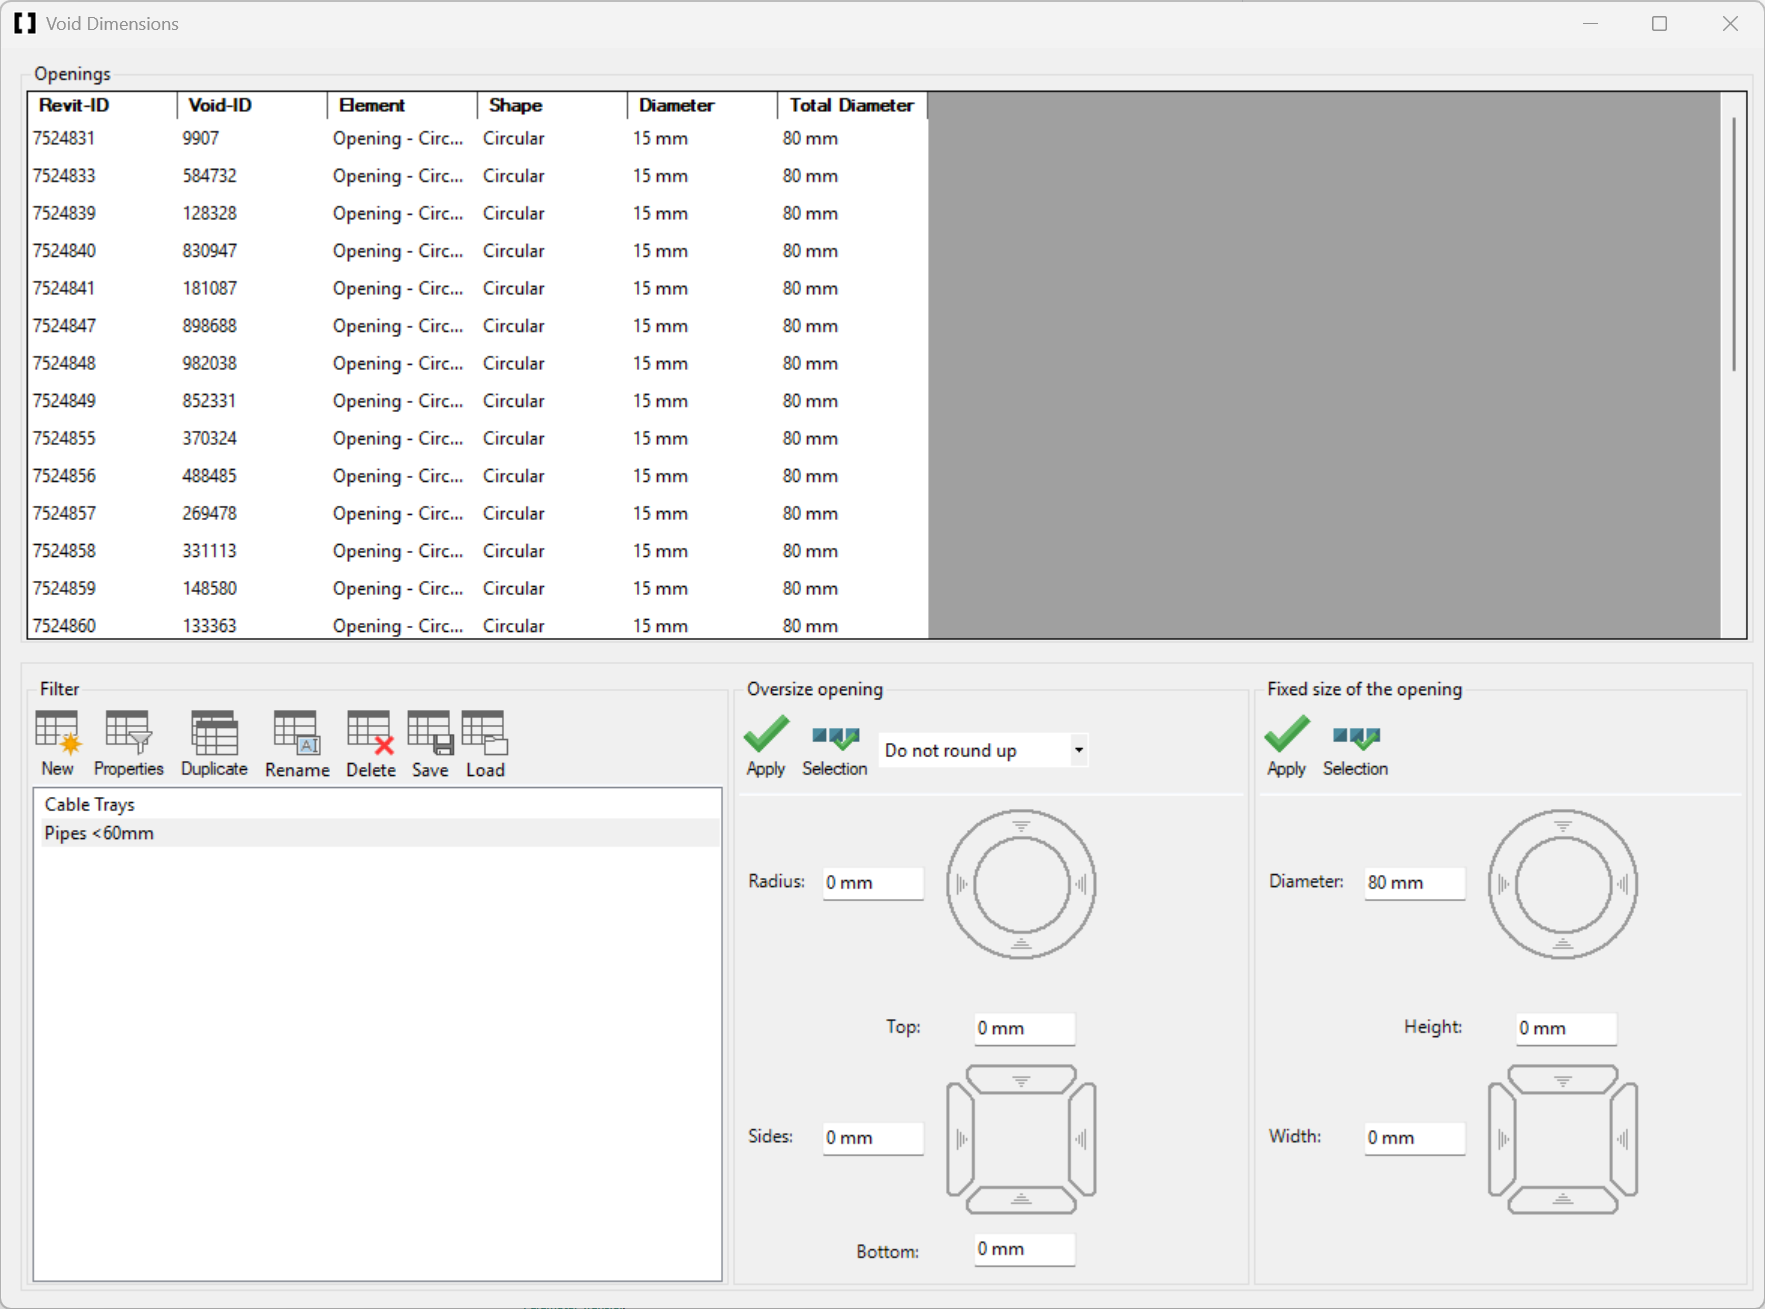
To set a specific oversize for a group of openings - for example, cable tray openings that need 50 mm extra space on each side:
-
Open [Dimension Void] from the conclass Ribbon Tab.
-
Create a [New] filter and name it "Cable Trays".
-
Go to [Properties] and filter the cable tray openings based on a parameter such as "System Abbreviation". If you don't have a suitable parameter, see Parameter Transfer.
-
Switch to [Fields] and keep only: Width, Height, Total Width, and Total Height. The Width and Height show the size of the reference element (e.g., cable tray). The Total Width and Total Height show the final opening size including oversize.
-
Set the oversize values for sides, top, and bottom.
-
Optionally, enable rounding to avoid odd dimensions (e.g., round up to the nearest 10 mm or 50 mm).
-
Click [Apply] to apply the size to all filtered openings, or select specific rows first and click [Selection] (see Apply vs. Selection).
You can set different oversize values for each side (top, bottom, left, right). This is useful for fire/smoke dampers or other elements with specific sealing requirements. For example, 37.5 mm on sides and bottom, 62.5 mm on top. The opening center stays aligned with the reference element center.
Fixed Size
To set a fixed size for a group of openings - for example, all pipe openings smaller than 60 mm should get a fixed opening diameter of 150 mm:
-
Open [Dimension Void] from the conclass Ribbon Tab.
-
Create a [New] filter and name it "Pipes <60mm".
-
Go to [Properties] and filter the pipe openings based on the relevant parameters. If you don't have a suitable parameter, see Parameter Transfer.
-
Switch to [Fields] and keep only: Diameter and Total Diameter. The Diameter shows the pipe size, the Total Diameter shows the final opening size including oversize.
-
Set a fixed value for the Total Diameter (e.g., 150 mm).
-
Click [Apply] to apply to all filtered openings, or select specific rows first and click [Selection].
Use Fixed Size to enforce minimum opening dimensions for specific categories. For example, if all pipe openings must be at least 200 mm in diameter regardless of the actual size, create a Dimension Void filter for pipes and set a fixed Total Diameter of 200 mm.
Apply vs. Selection
The Dimension Void dialog has two buttons to apply your sizing:
| Button | What it does |
|---|---|
| Apply | Applies the oversize or fixed size to all openings currently shown in the filtered table. |
| Selection | Applies the oversize or fixed size only to the rows you have selected in the table. Select the rows first, then click this button. |
You can also select multiple filters with different conditions and apply them at once.
Verify Your Results
After applying oversizes or fixed sizes:
- Check the Total Width / Total Height / Total Diameter values in the Dimension Void table to confirm the final opening sizes are correct.