Workflow B: Adopt Openings
When another discipline (e.g. MEP engineers) has already created openings in their model, you do not need to recreate them from scratch. Instead, you can adopt these Provision for Voids (PfV) from the linked model into your own project. ConVoid reads the linked openings, detects which host elements they intersect, and places optimized ConVoid openings automatically.
This is the standard workflow for structural engineers and architects who receive openings from MEP engineers or other disciplines.
In Workflow A, you create new openings from MEP services. In Workflow B, you adopt existing Provision for Voids (generic openings) from a linked model instead of creating new ones.
Before you begin, make sure you have completed these steps from earlier chapters:
- Import ConVoid Families into your project.
- Link the Revit or IFC model that contains the Provision for Voids.
- Define the Creation Scope (levels and section box).
- Create and save your profile.
Video Tutorial
User Interface Overview
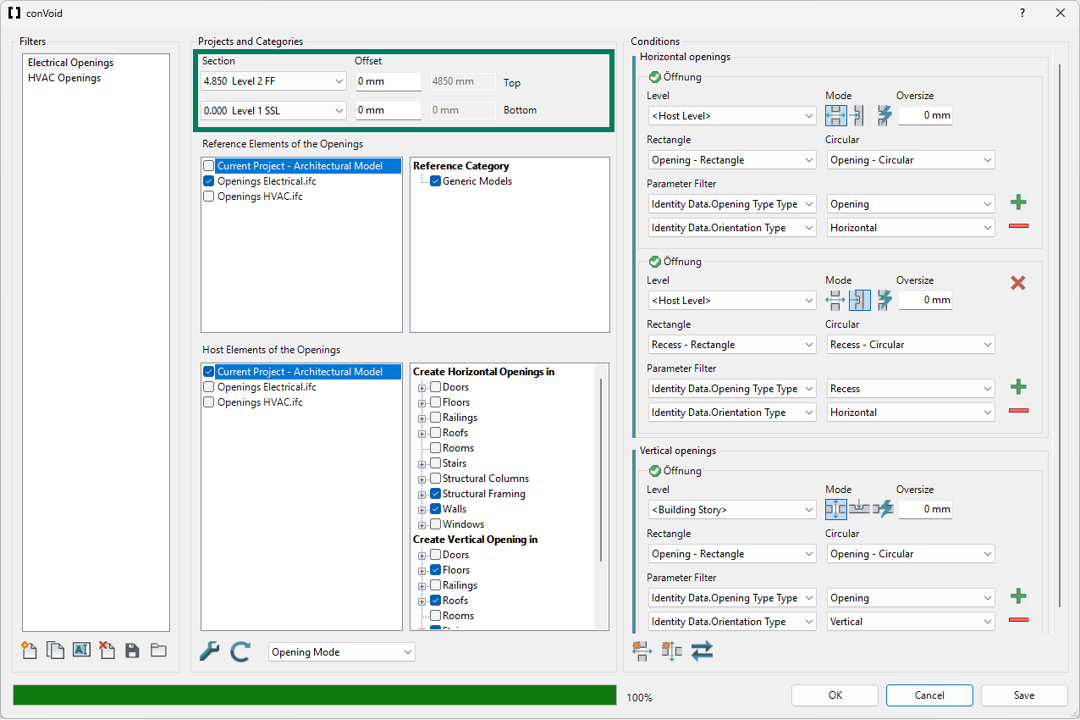
Before diving into the steps, here is the full ConVoid dialog for adopting openings. Each numbered section corresponds to a step below.
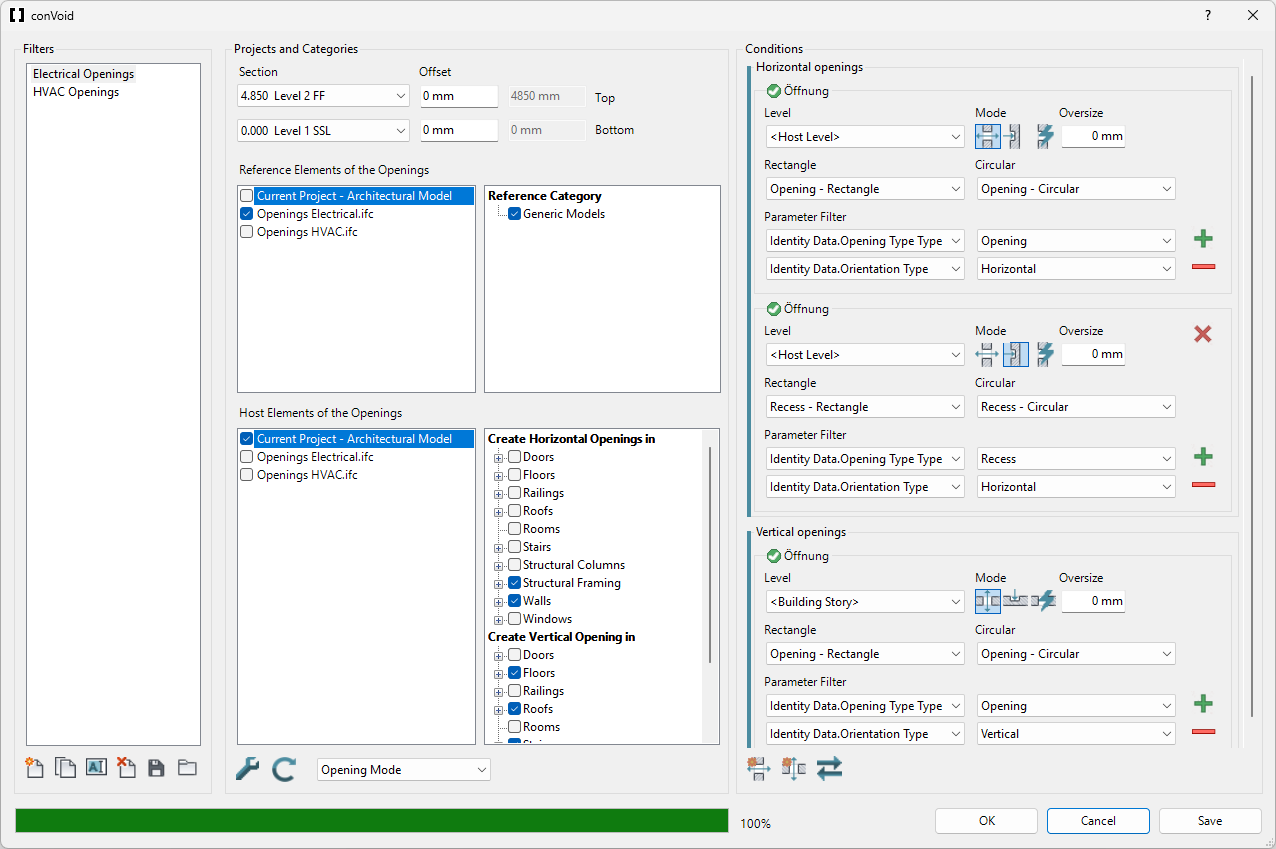
Step 1: Start ConVoid and Create Opening Filters
Go to the [conclass] ribbon tab in Revit and click Convert Void to open the ConVoid dialog.
Create an Opening Filter. This filter defines the conditions for the adoption process.
If multiple disciplines send you openings (e.g. HVAC and Electrical), create a separate filter for each discipline. This keeps your openings organized and lets you configure different settings per discipline.
| Icon | Action | Description |
|---|---|---|
| Create new filter | Creates a blank Opening Filter with default settings. | |
| Duplicate filter | Copies all settings of the selected filter. Useful when creating a second filter for another discipline. | |
| Rename filter | Give the filter a meaningful name, e.g. "Ventilation" or "Plumbing". | |
| Delete filter | Removes the selected filter permanently. | |
| Export filters | Saves all Opening Filters to an *.xml file for reuse in other projects. | |
| Import filters | Loads Opening Filters from an *.xml file into your project. |
Save your Opening Filters as *.xml using the save button and import them into new projects. This avoids repetitive setup, especially on projects with recurring discipline structures. You can also configure and share filters using the Save and Load Settings feature.
Step 2: Import ConVoid Families
If the ConVoid families are not yet loaded in your project, a dialog will prompt you to import them.
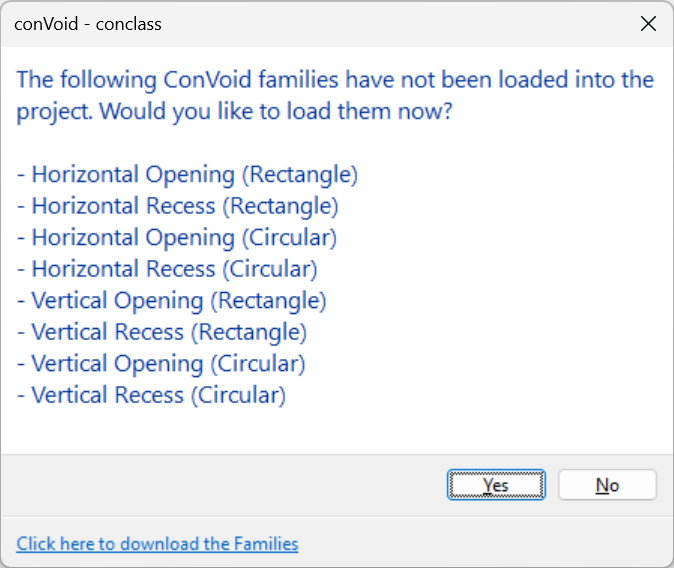
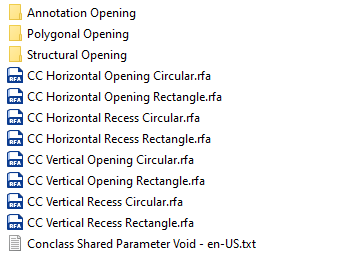
Click Yes and the ConVoid library folder will open. Import the families listed in the dialog into your project. If you cannot find the families, download them here.
If you followed the Import ConVoid Families chapter earlier, the families are already in your project and this dialog will not appear.
Step 3: Set the Adoption Scope
Define the upper and lower levels (and optional offsets) between which ConVoid should adopt openings. Only openings within this range will be processed.
If the Section Box in your 3D View is activated, the scope settings are grayed out because ConVoid uses the Section Box boundaries instead. Learn more in Define the Creation Scope.
Step 4: Select Reference Elements
The Reference Elements are the linked openings (Provision for Voids) you want to adopt.
- Select the linked project(s) that contain the openings.
- Choose the category of the linked openings. The most common category is Generic Models, but it can differ. To verify, select a linked opening in Revit and check its category in the Properties panel.

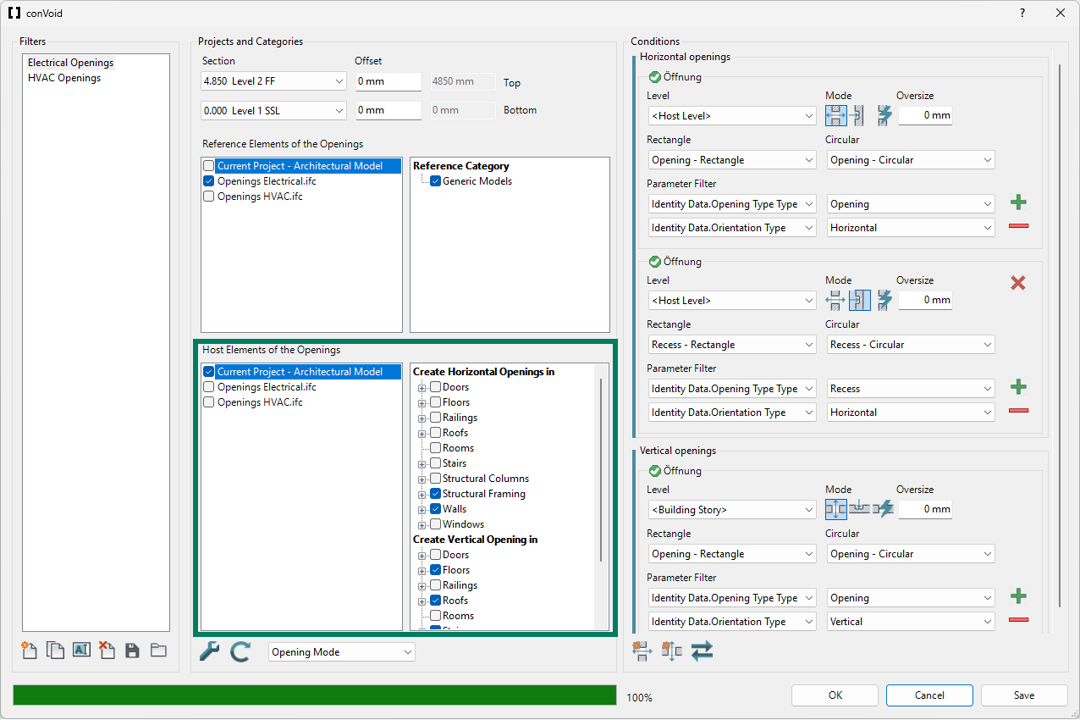
Step 5: Select Host Elements
The Host Elements are the building elements where ConVoid will place the adopted openings (walls, floors, roofs, beams, etc.).
- Select the linked project(s) that contain the host elements (typically the architectural and/or structural model).
- Choose the categories for horizontal openings (wall openings): Walls, Structural Framing, Structural Columns, etc.
- Choose the categories for vertical openings (floor openings): Floors, Roofs, Stairs, etc.
You can click the plus sign (+) next to a category to limit the creation to specific family types. If no types are selected, ConVoid uses all elements in that category. However, we recommend using the Exclude Elements by a 3D View feature instead, as it gives you more control and is easier to manage across updates.
ConVoid always needs at least one collision between a reference element and a host element to adopt an opening. If there is no host element at the location of the linked opening, ConVoid cannot place it.
Step 6: Settings
Open the settings by clicking the Toolbox icon. For your first run, use the default settings shown below. The settings are explained in detail in the Advanced Settings chapter.
Make sure the checkbox "Adopt Provision for Voids (Openings) from linked Model" is enabled. If this option is disabled, ConVoid will not read the linked openings correctly and may calculate wrong shapes or sizes. This is one of the most common causes of unexpected results.
Step 7: Run Clash Detection
Click the Refresh button to start the clash detection between your selected Reference and Host categories. ConVoid will analyze which linked openings intersect which host elements.
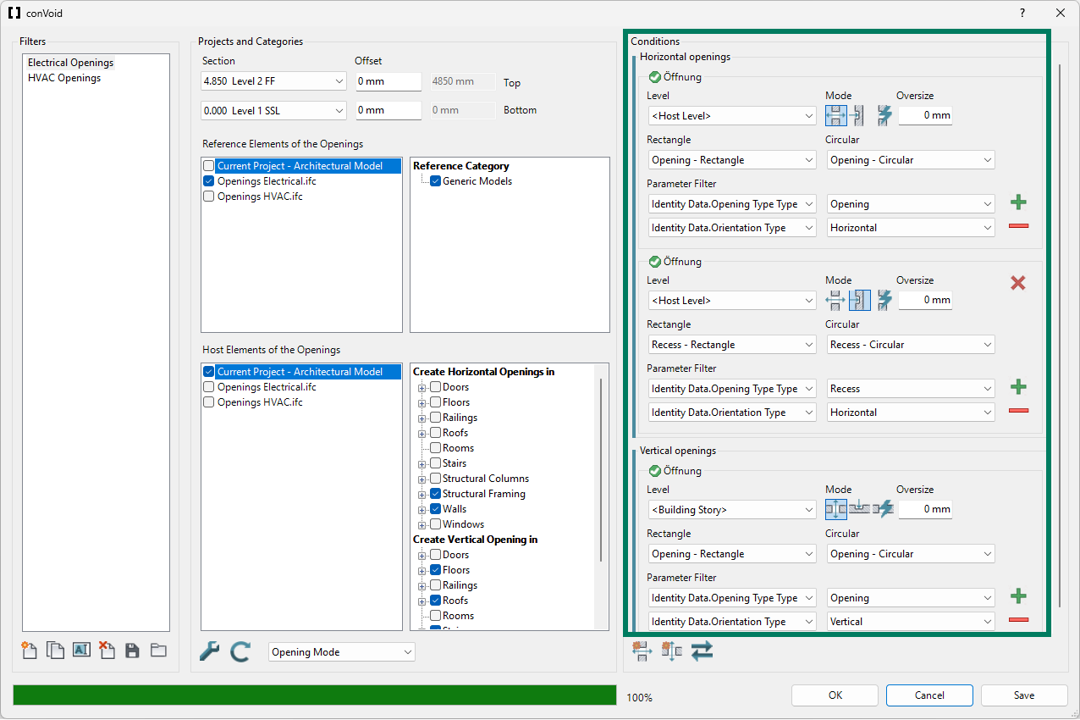
Step 8: Conditions and Parameter Filter
After the clash detection completes, the Conditions section becomes active. Here you configure how ConVoid should adopt the detected openings.
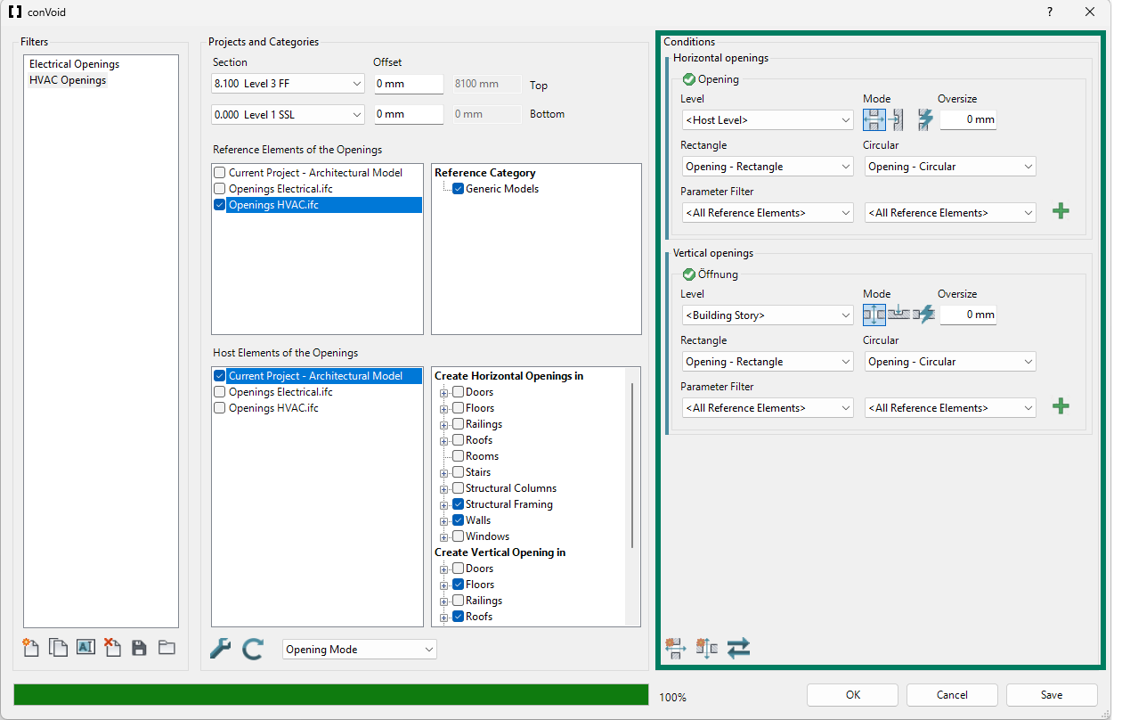
Level for Horizontal Openings
Select the level constraint for wall openings.
Use Host Level for horizontal openings. The opening follows the base and top level of the host wall, which is the most reliable option for walls.
Other options: Building Story (nearest upper/lower story), Reference Level (follows the linked opening's level), Specific Level (a fixed level you choose).
Level for Vertical Openings
Select the level constraint for floor/roof openings.
Use Building Story for vertical openings. The opening is constrained to the nearest upper and lower building story, which works best for floors and roofs.
Other options: Host Level (follows the floor's level), Reference Level (follows the linked opening's level), Specific Level (a fixed level you choose).
Creation Mode
Choose how ConVoid should adopt the linked openings:
| Icon | Mode | Illustration | Description |
|---|---|---|---|
| Opening | 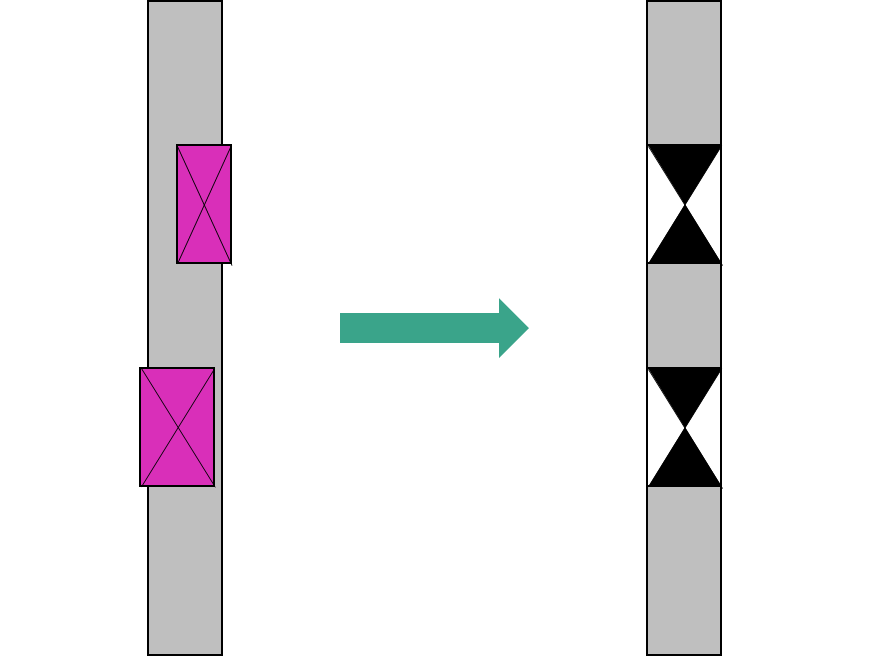 | ConVoid will create penetrations that fully intersect the Host Element, even if the Reference Element does not penetrate the Host Element completely. | |
| Recess | 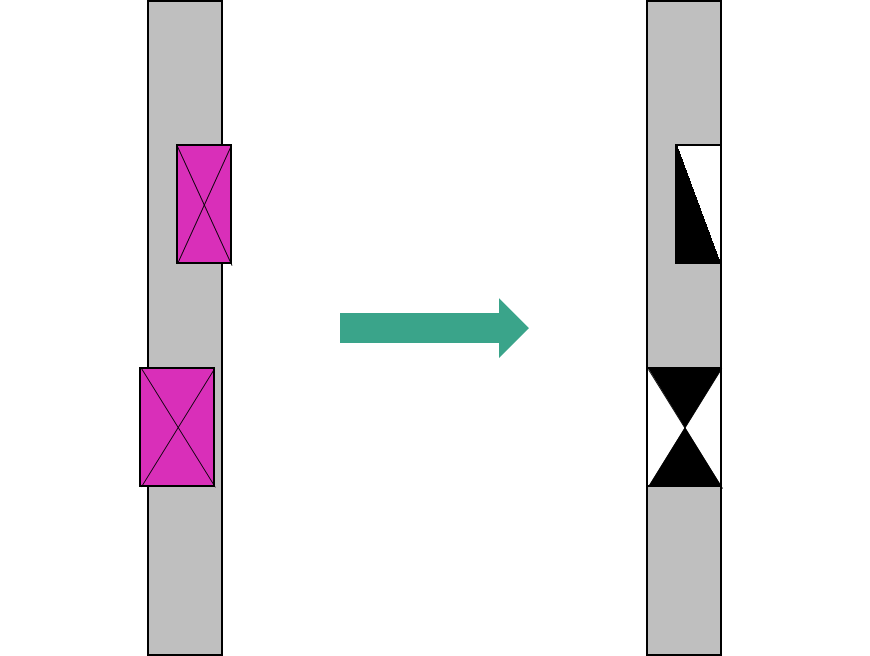 | If the Reference Element does not fully intersect the Host Element, ConVoid will create a recess. However, if the reference element does intersect the Host Element, it will generate a penetration. | |
| Auto | 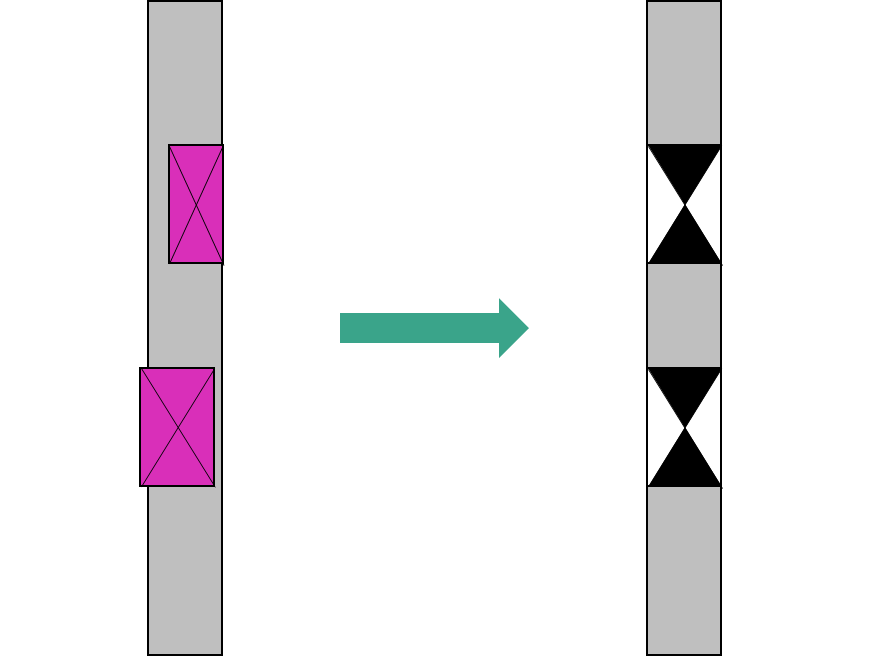 | ConVoid automatically decides between penetration and recess based on geometry. If you can filter the openings based on parameters, this mode is not recommended to use. |
The Creation Mode directly affects the result. Read the Parameter Filter section below before selecting a mode. If your linked openings have type descriptions (e.g. "Wall Opening", "Floor Recess"), use specific modes per filter. If they do not, use Auto mode.
Oversize
The oversize value adds a clearance zone around the opening. Since the goal of Workflow B is to adopt the exact dimensions of the linked openings, keep this value at 0.
Rectangle and Circular Families
The rectangular and circular opening families are selected automatically. You can duplicate or rename ConVoid families to create custom types. See the Family Overview chapter for details.
Parameter Filter
The parameter filter is the most common source of errors when adopting openings. Incorrect setup leads to round openings becoming square, unwanted openings appearing, and recesses being created where full penetrations should be. Take your time with this section.
Why the parameter filter matters
ConVoid needs to know two things about each linked opening: what it is (opening or recess) and where it goes (horizontal or vertical). Without this information, ConVoid guesses based on geometry alone - and geometry is not always accurate. For example:
- A wall opening that sticks out 50 mm into the floor above will also create an unwanted recess in that floor.
- A wall opening that does not fully penetrate the wall will be misread as a recess instead of a full opening.
The parameter filter solves this by telling ConVoid exactly which openings are wall openings, which are floor openings, and which are recesses.
Whether an opening is horizontal or vertical depends on the direction of its depth:
- If the depth is measured horizontally (through a wall), it is a horizontal opening.
- If the depth is measured vertically (through a floor or roof), it is a vertical opening.
How to check your linked openings
Before setting up the filter, select a linked opening in Revit and review its parameters. Look for a parameter that describes the type or orientation:
via one single parameter:
- Type + Orientation: Wall Opening, Wall Recess, Floor Opening, Floor Recess
or a combination of two parameters:
- Type: Opening, Penetration, Recess, Provision for Void
- Orientation: Horizontal, Vertical
These parameter names and values vary between projects because each software and planner may define them differently. The key is to find any parameter that lets you distinguish between wall openings, floor openings, and recesses.
- With Type Descriptions (recommended)
- Without Type Descriptions
This is the more reliable approach. Group the openings by type using the parameter filter and assign the correct Creation Mode and orientation to each group.
Follow these steps:
- Add a horizontal opening type (for wall openings): Click Add horizontal opening type. Select the parameter and value that identifies wall openings (e.g. Type = "Wall Opening"). Set the Creation Mode to Opening.
- Add a vertical opening type (for floor openings): Click Add vertical opening type. Select the parameter and value that identifies floor openings (e.g. Type = "Floor Opening"). Set the Creation Mode to Opening.
Always Constrain to the Correct Orientation: The most critical mistake is adding an opening type without setting it to the correct orientation (horizontal or vertical). If you add a "Wall Opening" as a vertical type, ConVoid will look for it in floors instead of walls - resulting in missing or misclassified openings.
Rule of thumb: Depth goes horizontally (through a wall) = horizontal opening. Depth goes vertically (through a floor/roof) = vertical opening.
If the linked openings have no parameter to distinguish types, select <All Reference Elements> as the parameter filter. The green indicator above the filter shows approximately how many openings match your selection.
Set the Creation Mode to Auto so ConVoid decides between penetration and recess based on geometry.
Less precise results: Without type descriptions, ConVoid relies on geometry alone to decide between penetration and recess. This can lead to unwanted recesses (e.g. a wall opening that slightly intersects a floor) or wrong shapes. If you experience issues, ask the sending discipline to add type parameters to their openings.
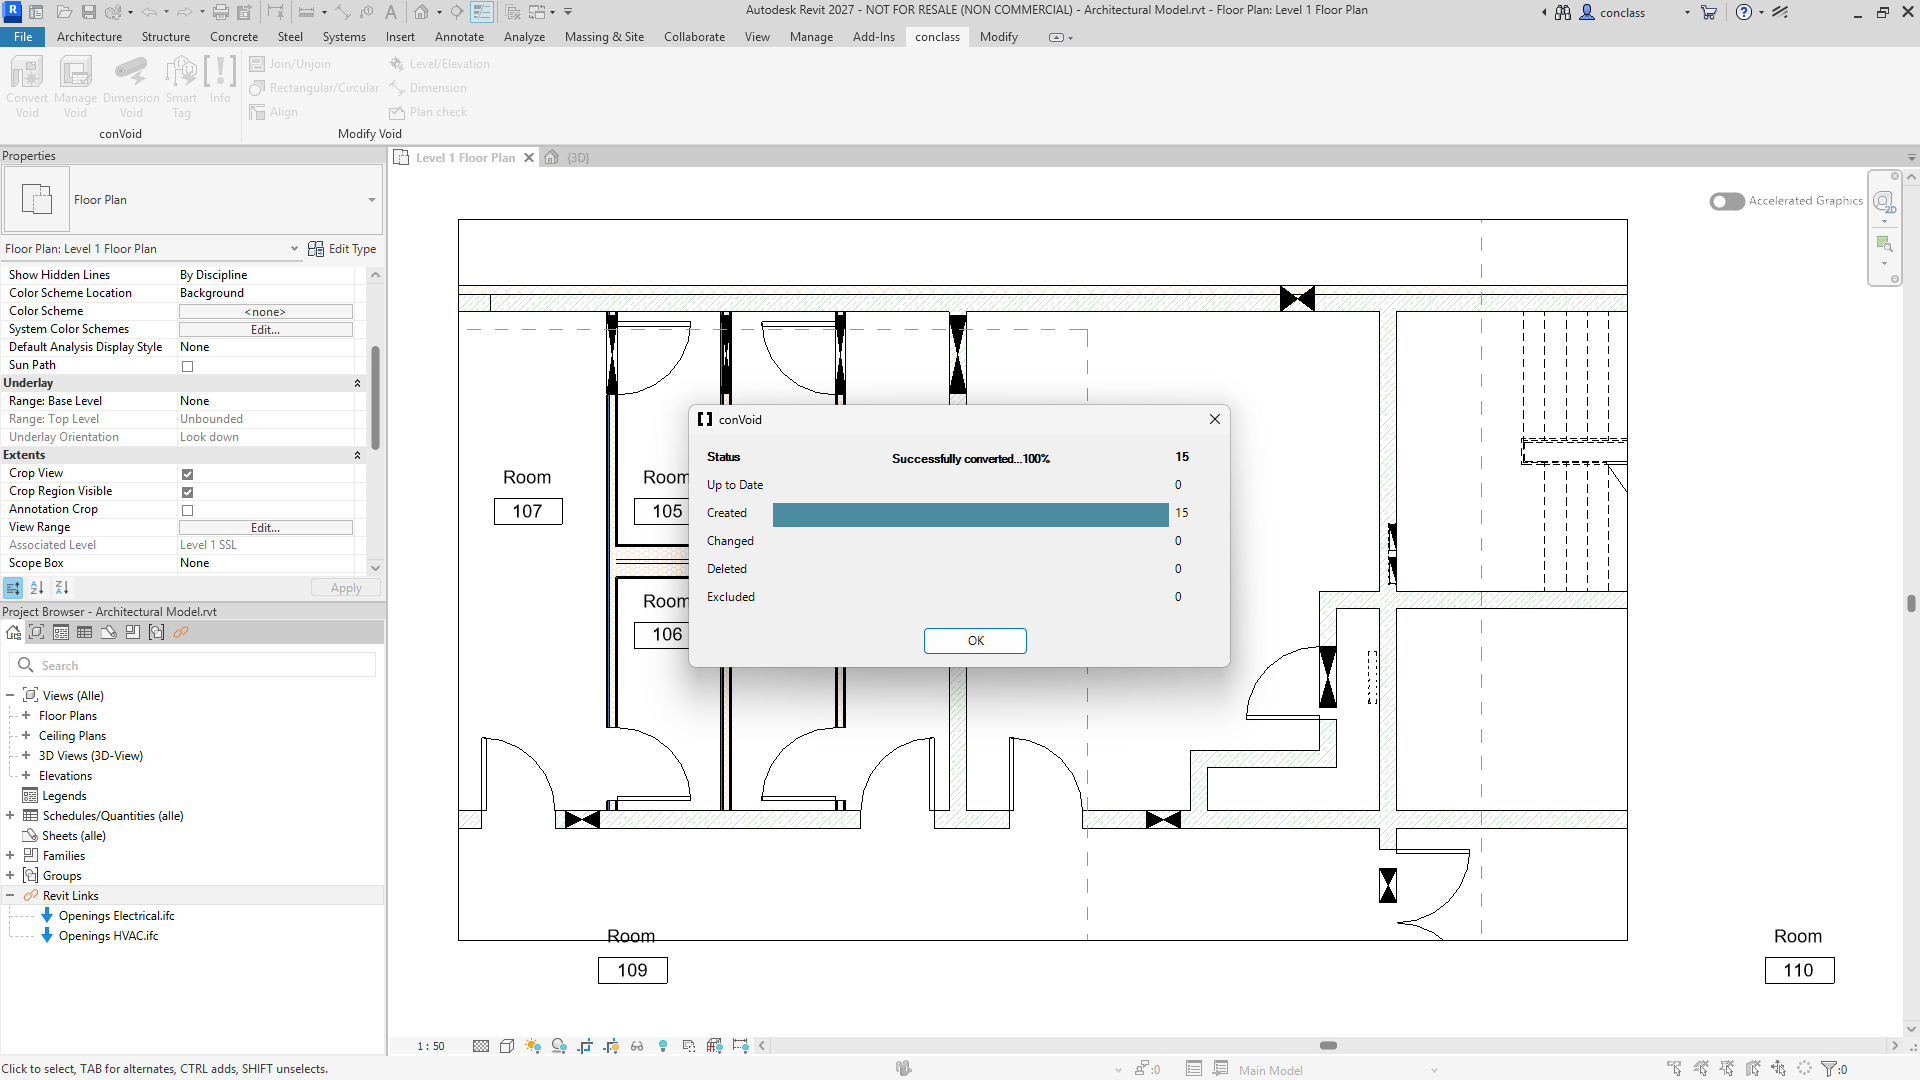
Step 9: Start the Adoption Process
Click OK to start. ConVoid places the openings automatically in your project. All settings are saved when you click OK.
The openings appear as symbols in 2D views and as solids in 3D views. You can customize the symbols in the Family Symbols chapter.
After the creation process, review the result summary. Check that the number of created, changed, and deleted elements makes sense. If the results look unexpected (e.g. too many openings marked as deleted), undo immediately with Ctrl+Z and review your filter settings before running again.
Step 10: Add More Opening Filters
After the first adoption run, you can add more filters for other disciplines or opening types:
- Open ConVoid and create a new Opening Filter (or duplicate and rename an existing one).
- Select the models and categories for the new filter.
- Configure the parameter filter and creation mode.
- Run ConVoid again.
Repeat as needed for all disciplines in your project.
Never create multiple filters that reference the same linked openings. This causes conflicts and results in duplicate openings. Each linked opening must be covered by exactly one filter. Use one filter per discipline - not multiple filters splitting the same set of openings by area or building section. If you need to limit the scope, use the 3D Section Box instead.
Verify Your Results
To quickly find mismatches between linked and adopted openings, use this method:
- In a 3D view, isolate all linked openings (from the reference model) and color them yellow.
- In the same view, isolate all adopted ConVoid openings and color them blue.
- Where both overlap, the openings appear green - this means a full match.
- Openings that remain yellow were not adopted (check your filter settings). Openings that remain blue have no matching linked opening (possible mismatch).
Use the Void-ID (parameter: Mark) to compare linked and adopted openings and verify that each adopted opening matches its corresponding reference element. To ensure the Void-ID is consistent between the linked and adopted openings, set up the Parameter Transfer before running the adoption process. Transfer the Mark parameter from the reference element to the Mark parameter of the ConVoid opening. See Parameter Transfer for details.