Exchange with Other Disciplines
Why Exchange Matters
Builder's work openings only add value when every discipline (Architecture, Structure, MEP) agrees on them. The Exchange feature moves that agreement (geometry, approval status, comments and snapshots) between models and partners.
Which format you pick depends on what your partner uses.
Before you export or import, complete one of:
Overview of Exchange Formats
| Format | Geometry | Approvals | Comments | Snapshots |
|---|---|---|---|---|
| Revit (RVT) | ✅ | ✅* | ✅* | ❌ |
| BCF | ❌ | ✅ | ✅ | ✅ |
| IFC | ✅ | ❌ | ❌ | ❌ |
| CC (ConVoid Manager) | ✅ | ✅ | ✅ | ✅ |
| Excel (XLSX) | ❌ | ✅ | ✅ | ❌ |
| CSV | ❌ | ✅ | ❌ | ❌ |
| PDF (2D Plans) | ✅ | ❌ | ❌ | ❌ |
* Only preserved when both sides use ConVoid.
- Partner works with ConVoid: Use CC (ConVoid Manager), Revit + Approval Synchronisation, or Revit + BCF.
- Partner works with BIM but not ConVoid: Use BCF and IFC (open-BIM standards).
- Partner does not work with BIM: Use Excel and PDF (2D Plans).
On every import (BCF, CC, Excel, Approval Synchronisation), do not tick your own discipline in the list. Importing your own discipline overwrites the approvals you already made. Always import only from the partner's discipline.
RVT: Revit
Share Revit File
Share the Revit file with your project partner as usual. If you approved the openings with ConVoid, approvals and comments travel inside the file automatically.
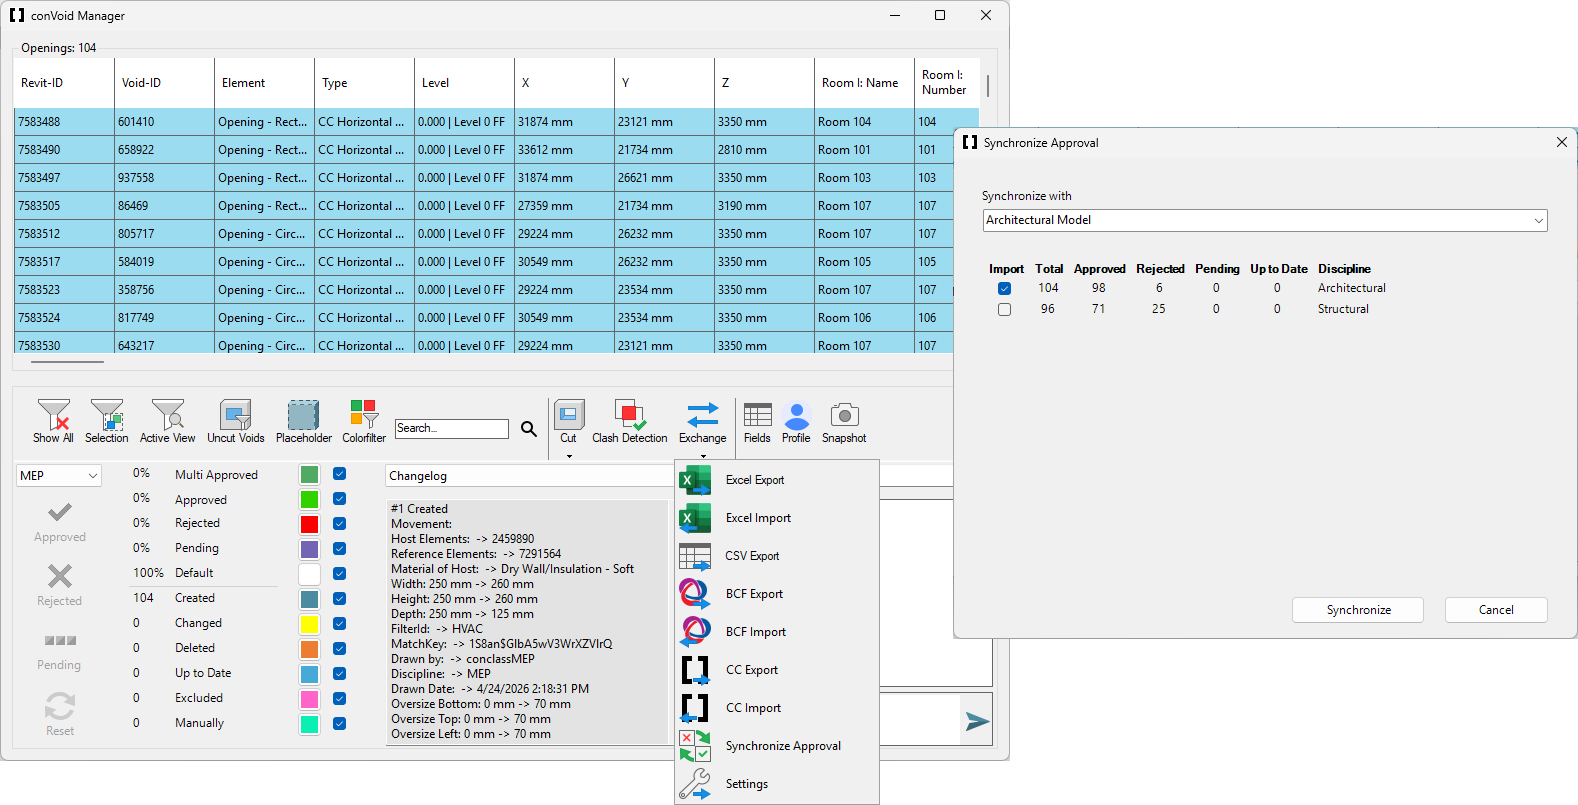
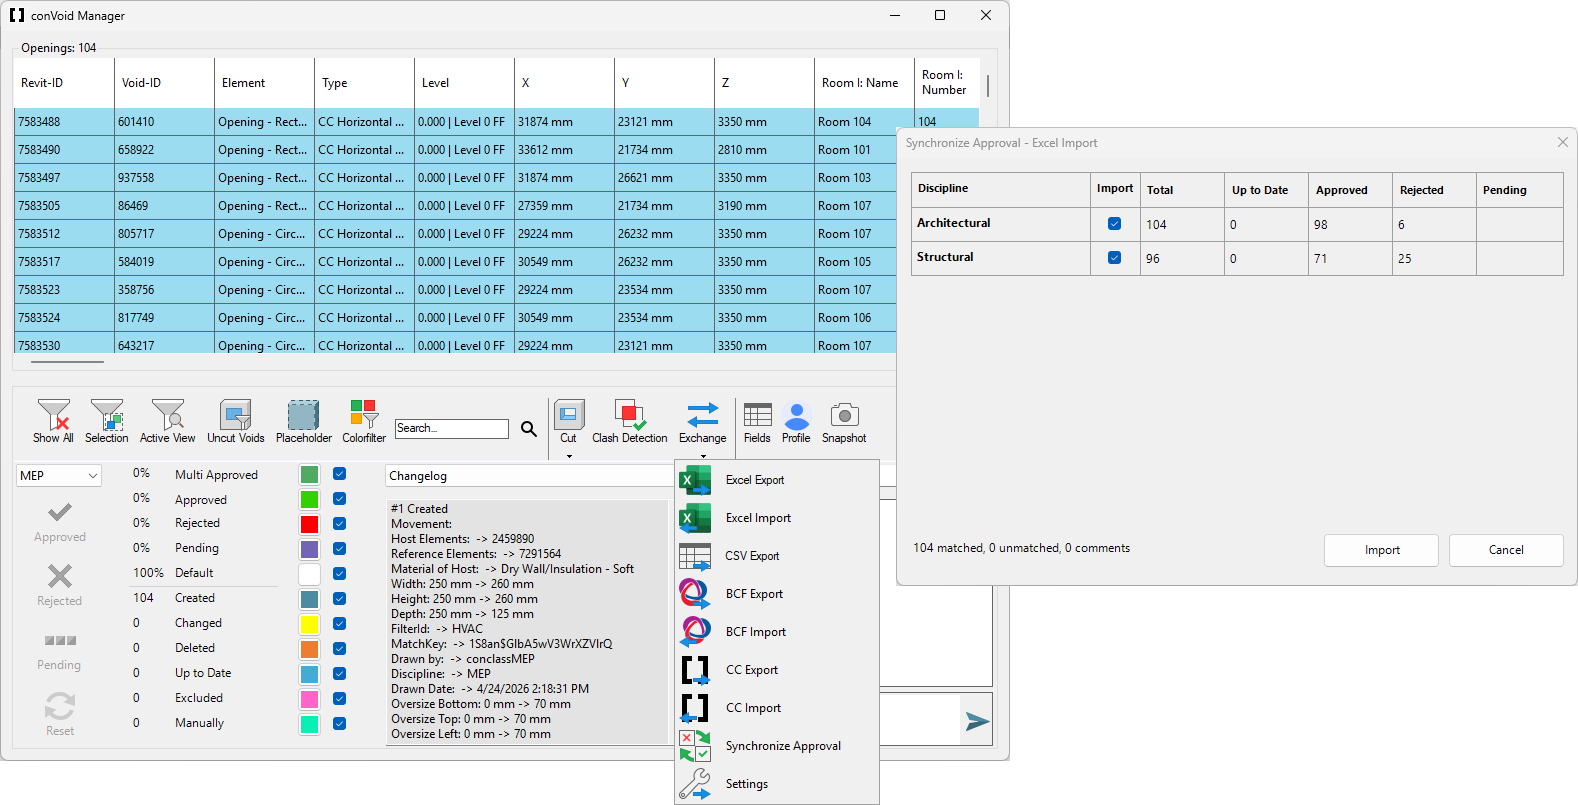
Synchronize Approvals
When you receive a Revit file with reviewed openings (for example from Architecture or Structure), use Approval Synchronisation to transfer status and comments in bulk.
- Link the external Revit file into your project, as you learned in Link Revit and IFC Files.
- Open the conclass ribbon tab and click Void Manager.
- Click Exchange → Synchronize Approval. A window appears.
- Select the linked Revit model in the top dropdown. A list of approvals per discipline appears.
- Tick the discipline you want to import (for example ARC or STR).
- Click Import. Approvals and comments are merged into your openings.
Approval Synchronisation only works if the partner adopted your openings with Workflow B: Adopt Openings. If the partner copied, re-created or manually placed the openings, the link between your openings and theirs is broken and no approvals can be transferred.
BCF: BIM Collaboration Format
BCF is the open-BIM standard for issue exchange. It is typically used to exchange approvals with BCF platforms (BIMcollab, BIM Track, Solibri, Stabicad), but also works between ConVoid users, especially for snapshots. ConVoid creates a BCF entry for each opening automatically.
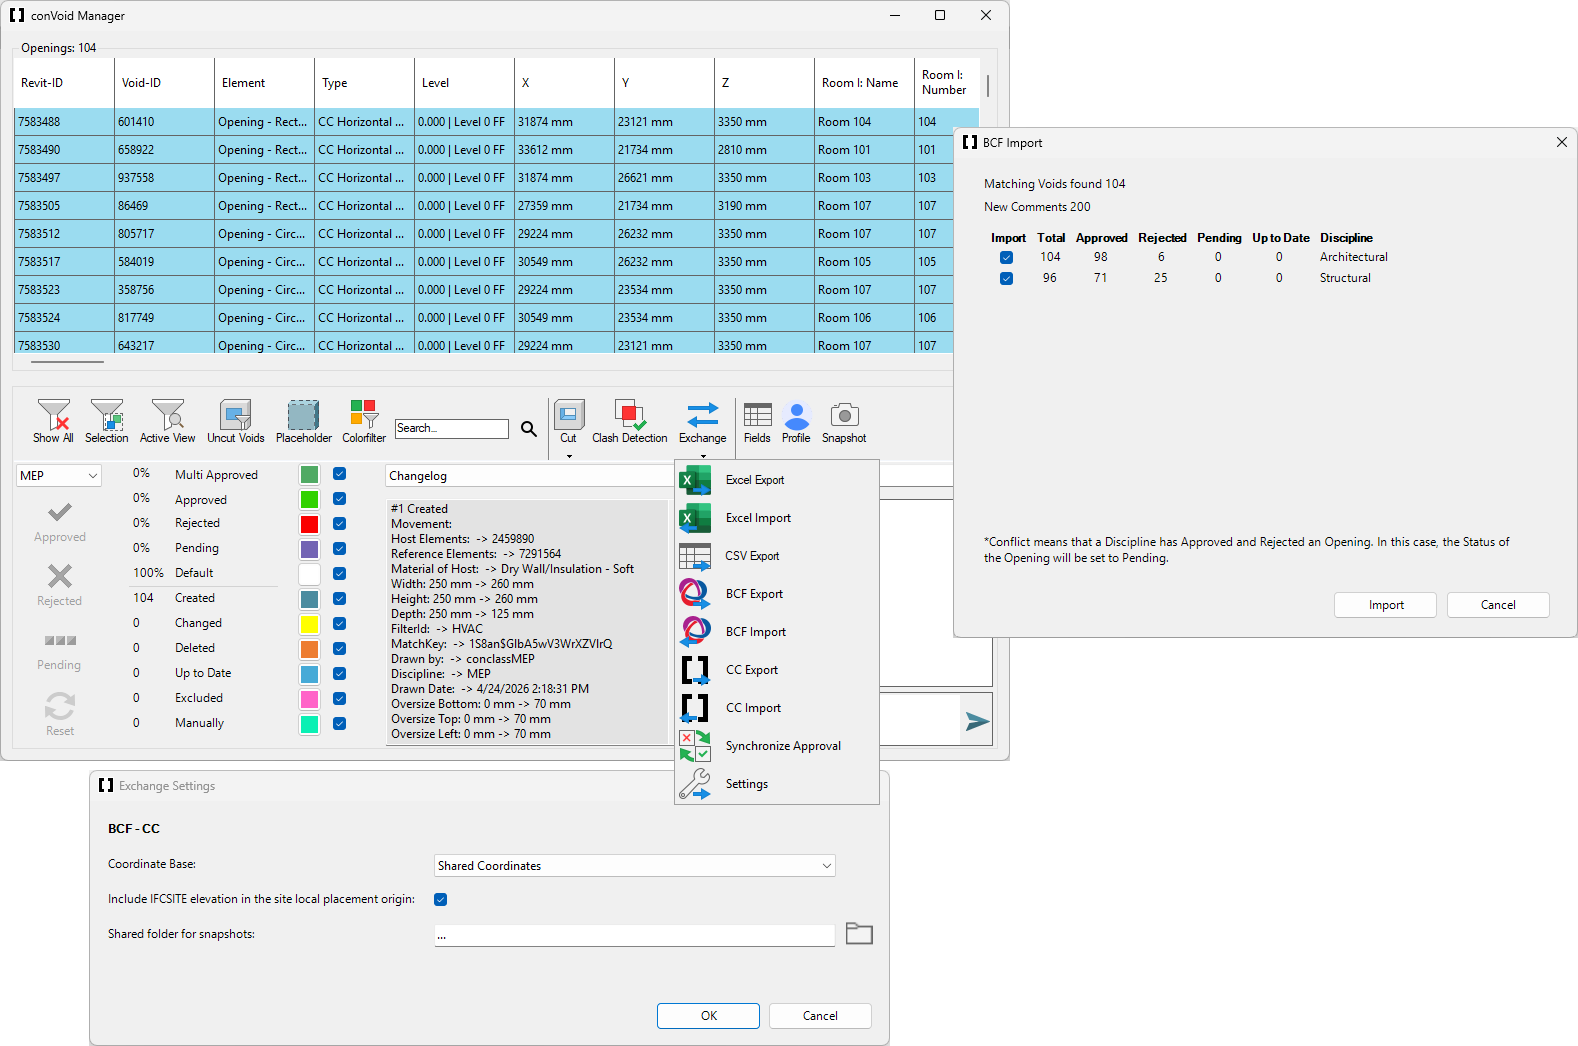
Coordinate Settings
Before your first export, set the coordinate base. The same settings apply to BCF, CC and IFC exports.
- Open the conclass ribbon tab and click Void Manager.
- Click Exchange → Settings.
- Select the Coordinate Base and, if needed, include the IFCSITE elevation. Click OK.
- Restart the Void Manager. The settings are stored in your Revit project.
Export BCF
- Open the Void Manager and click Exchange → BCF Export.
- Save the
.bcfor.bcfzipfile and send it to your partner.
Add dynamic titles to each opening before exporting the BCF (for example using parameter values like Level, Shape, Dimensions). This makes issues easier to identify in BIMcollab or other platforms.
If your BCF export suddenly shows labels in a wrong language, somebody changed the project language. Go to Void Manager → Profile → Project Language, reselect your language and re-export. The labels must also exist in the target BCF system (BIMcollab, BIM Track), otherwise the status is ignored.
Import BCF
- Open the conclass ribbon tab and click Void Manager.
- Click Exchange → BCF Import. A window appears.
- Locate the
.bcffile you received and click Open. A list of approvals per discipline appears. - Tick the discipline you want to import (for example ARC or STR).
- Click Import. Approvals, comments and snapshots are merged into your openings.
If the Manager shows the imported status correctly but the openings in Revit keep their old status, the BCF usually maps to labels that do not exist in your project, or the openings were copy-pasted and no longer share an IfcGuid with the BCF issues. Check the label setup first.
IFC: Industry Foundation Classes
IFC is used to share the geometry of openings (or Provisions for Voids) with disciplines. Combine IFC with BCF for the full workflow.
Process IFC
ConVoid can process any IFC model to create or adopt openings. Follow Workflow A: Create Openings or Workflow B: Adopt Openings. After creating or adopting, run the approval workflow and share your results via BCF, Excel or other formats.
Export IFC
Once you have processed the IFC file and created Revit ConVoid Openings, you can export the openings back as IFC. Make sure the Coordinate Settings match the ones used for BCF and CC.
To make sure only the relevant openings are exported, we recommend the following steps:
- Open the conclass ribbon tab and click Void Manager.
- Switch to a 3D view.
- Filter and select the openings you want to export in the table.
- Isolate the openings in the 3D view.
- Run the IFC Export based only on elements visible in the active view.
Without a custom Pset_ProvisionForVoid definition file added to Revit's IFC export settings, the dimensions and properties of your openings will not be exported correctly and will appear wrong in the receiving software.
Set up the Pset file once per project:
- Save the following template as a
.txtfile. Adapt the parameter names on the right side to match the parameter names in your project language if needed.PropertySet: Pset_ProvisionForVoid I IfcBuildingElement
Width Length Total Width
Height Length Total Height
Depth Length Total Depth
Length Length Total Length
Perimeter Length Perimeter
Lateral Surface Area Lateral Surface
Sealing Volume Sealing
Volume Volume Volume
Occupancy % Integer Occupancy %
Abbreviation Text Abbreviation Type A
Orientation Text Orientation
Opening Type Text Opening Type
Opening Name Text Assembly Code
System Text System Abbreviation
Fire Rating Text Fire Rating
Host Material Text Material of Host - In Revit's IFC export settings, add the file under User Defined Property Sets.
- Run the IFC export again.
By default, comments live inside the Void Manager and are not stored on the opening as a readable parameter, so they are not written into the IFC. To export them, add the Chat Log shared parameter to your project as a project parameter for the Generic Models category. The parameter is included in the ConVoid shared parameter file that ships with the ConVoid Families (download here).
Each time you close the Void Manager, ConVoid writes the latest comments of every opening to its Chat Log parameter. After that, the comments travel with the opening into the IFC. In Revit's IFC export settings, make sure Export user-defined property sets is enabled so the parameter is written to the file.
CC: ConVoid Manager
CC is the native ConVoid format used by the ConVoid Manager (Stand-Alone). It is the only format that carries everything: geometry, approvals, comments and snapshots.
Export CC
- Make sure the Coordinate Settings are set correctly.
- Open the Void Manager and click Exchange → CC Export.
- Save the
.ccfile and send it to your partner.
The export includes all visible models and elements of your active view plus your approvals, snapshots and comments. Other project participants can process the file with the ConVoid Manager Stand-Alone (see Approval with ConVoid Manager Standalone).
Import CC
- Open the conclass ribbon tab and click Void Manager.
- Click Exchange → CC Import. A window appears.
- Locate the
.ccfile you received and click Open. A list of approvals per discipline appears. - Tick the discipline you want to import (for example ARC or STR).
- Click Import. Approvals, comments and snapshots are merged into your openings.
XLS: Excel
Use Excel for reporting, project documentation and per-opening change logs. The export takes the current Void Manager table (columns, filters and sort order) and writes it to .xlsx.
Export Excel
- Set up the table in the Void Manager: show the columns you need via Fields, then filter and sort as desired.
- Click Exchange → Excel Export.
- Open the
.xlsxfile and adjust layout, logo and structure as needed.
The export includes all parameters, approvals, comments and the full change log per opening (position, dimensions, oversize, levels, shape, transferred parameters). Other project participants can approve and comment on openings via the Excel file (see Approval with Excel).
Import Excel
You can import the Excel file with approvals and comments:
- Open the conclass ribbon tab and click Void Manager.
- Click Exchange → Excel Import. A window appears.
- Locate the
.xlsxfile you received and click Open. A list of approvals per discipline appears. - Tick the discipline you want to import (for example ARC or STR).
- Click Import. Approvals and comments are merged into your openings.
CSV
CSV is a lightweight export for data pipelines, dashboards and schedules where you only need the parameters and status of the openings. Unlike Excel, CSV does not carry comments or change logs.
Export CSV
- Set up the table in the Void Manager: show the columns you need via Fields, then filter and sort as desired.
- Click Exchange → CSV Export.
- Save the
.csvfile.
PDF: 2D Plans
PDF is for plan issue. Use Revit's native Print / Export to PDF with your usual plan sheets. Each sheet contains the openings as drawn, with their tags and dimensions, but no approvals, comments or snapshots.